![Text reads "the ultimate guide to clay lightner [sic]" over an image of hands one is holding the color bowl filled with product while the other mixes it with a pink color brush](https://dawnbradley.com/wp-content/uploads/2021/03/db_claylightenervsbleach_pin_1-1.png)
create natural-looking, long-lasting results
I want to say this is a debate as old as time, but that would be a major exaggeration since I don’t think bleach or clay lightener have been around since the beginning of time…
Anyway… Back to the real topic at hand. Clay lightener vs bleach: which one is better?
I don’t think there’s a true answer to this question since everyone has their own preference. But I would argue that clay lightener is better for the integrity of hair.
There’s no better example of this than my client, Aelita.
When Aelita first came in for her custom consultation with me, almost 3 years ago, she had been fully bleaching her hair and her breakage was pretty wild. She coined the term “back bangs” to lovingly describe the short stubs of breakage around the nape of her neck.
The big goal was to get her hair back to healthy, and in full transparency, I told Aelita it was going to be a journey.
I’m so freakin’ stoked that she committed to her hair and didn’t relapse with the bleach.
I’ve been using clay lightener exclusively on Aelita’s hair since her first appointment. And holy cow the transformation is amazing!!
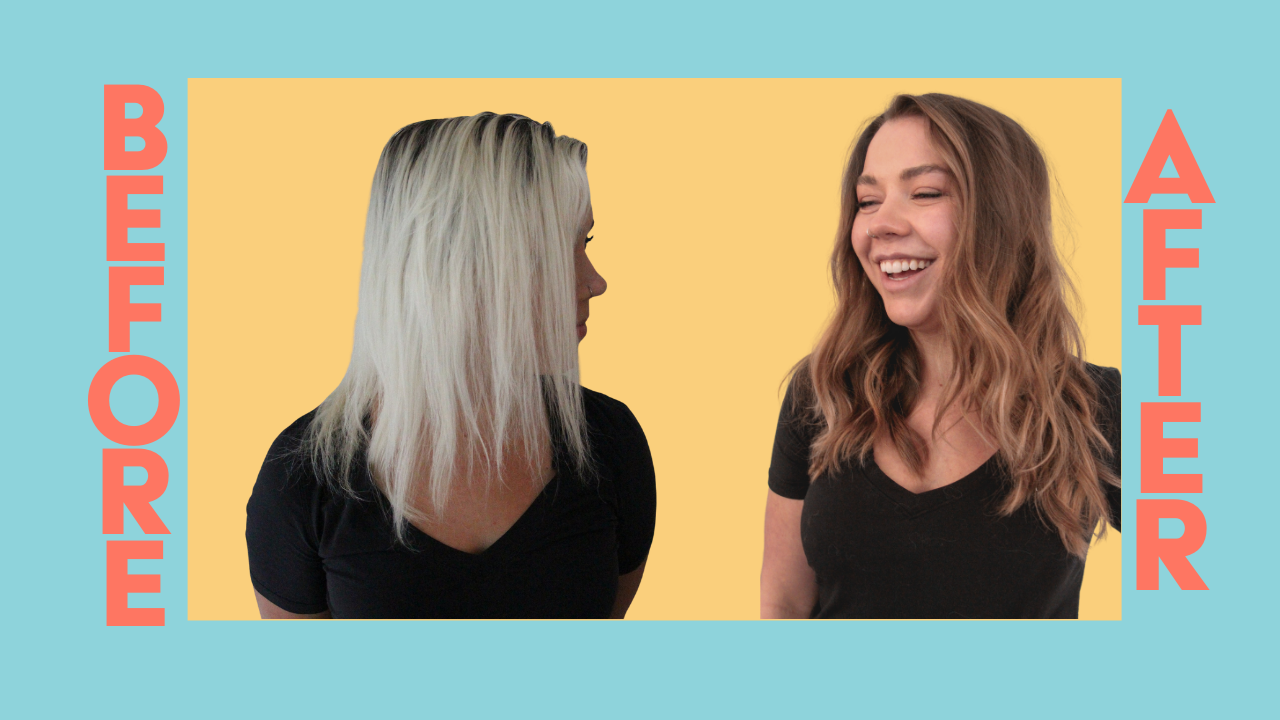
Now that she’s fully embracing her natural brunette locks, we wanted to give her some subtle, natural-looking highlights. Aelita requested “make it look like I spent 5 minutes in the sun”. I think we achieved it pretty well!
I’m breaking it down step by step for ya here:
Beachy Brunette with Clay Lightener
Step 1: Mix up your clay lightener
I’m using Redken Free Hand with 40 Vol developer
Step 2: Apply highlights using the rule of percentages
Because Aelita is happy with her natural color and it took her a long time to grow it out, I don’t want to over highlight her hair and have her looking blonde.
Remember the rule of percentages:
-
If they want to be blonde and bright, more than 50% highlighted
-
If they want to keep their natural brunette hair less than 50% should be highlighted
PRO TIP: I’m using wider panels and horizontal strokes to create a diffused, blended and beautiful color
Step 3: DON’T create a money piece
You might be tempted to add more highlights around the face, but we are not creating a bright money piece for this look. We are adding a very subtle dimension to the hair.
Less is more!
PRO TIP: Apply lightener no higher than the eyebrow when creating a natural-looking balayage
Step 4: Scratch test to see if your lightener is ready
Step 5: Rinse and flash tone at the sink
No shadow root required for this technique. One toner is all you need. I’m using a combination of 8V and 8T (watch the video to see how it looks).
Step 6: Blow dry, style and snap those pics!
Your clients are going to LOVE the results and they’re also going to love saving money since you don’t have to shadow root.
I wanna know, will you be trying out this technique with your clients? Why don’t you shoot me a DM over on Instagram @dawnbradleyhair and tell me all about it!
Featured


Go on, binge the latest posts (you know you wanna)…